Intonation on the trumpet depends on two primary factors:
- The harmonic (overtone) series
- The compensations made by manufacturers (and trumpet players) that allow the trumpet to function with only three valves
The Harmonic (Overtone) Series for Trumpet
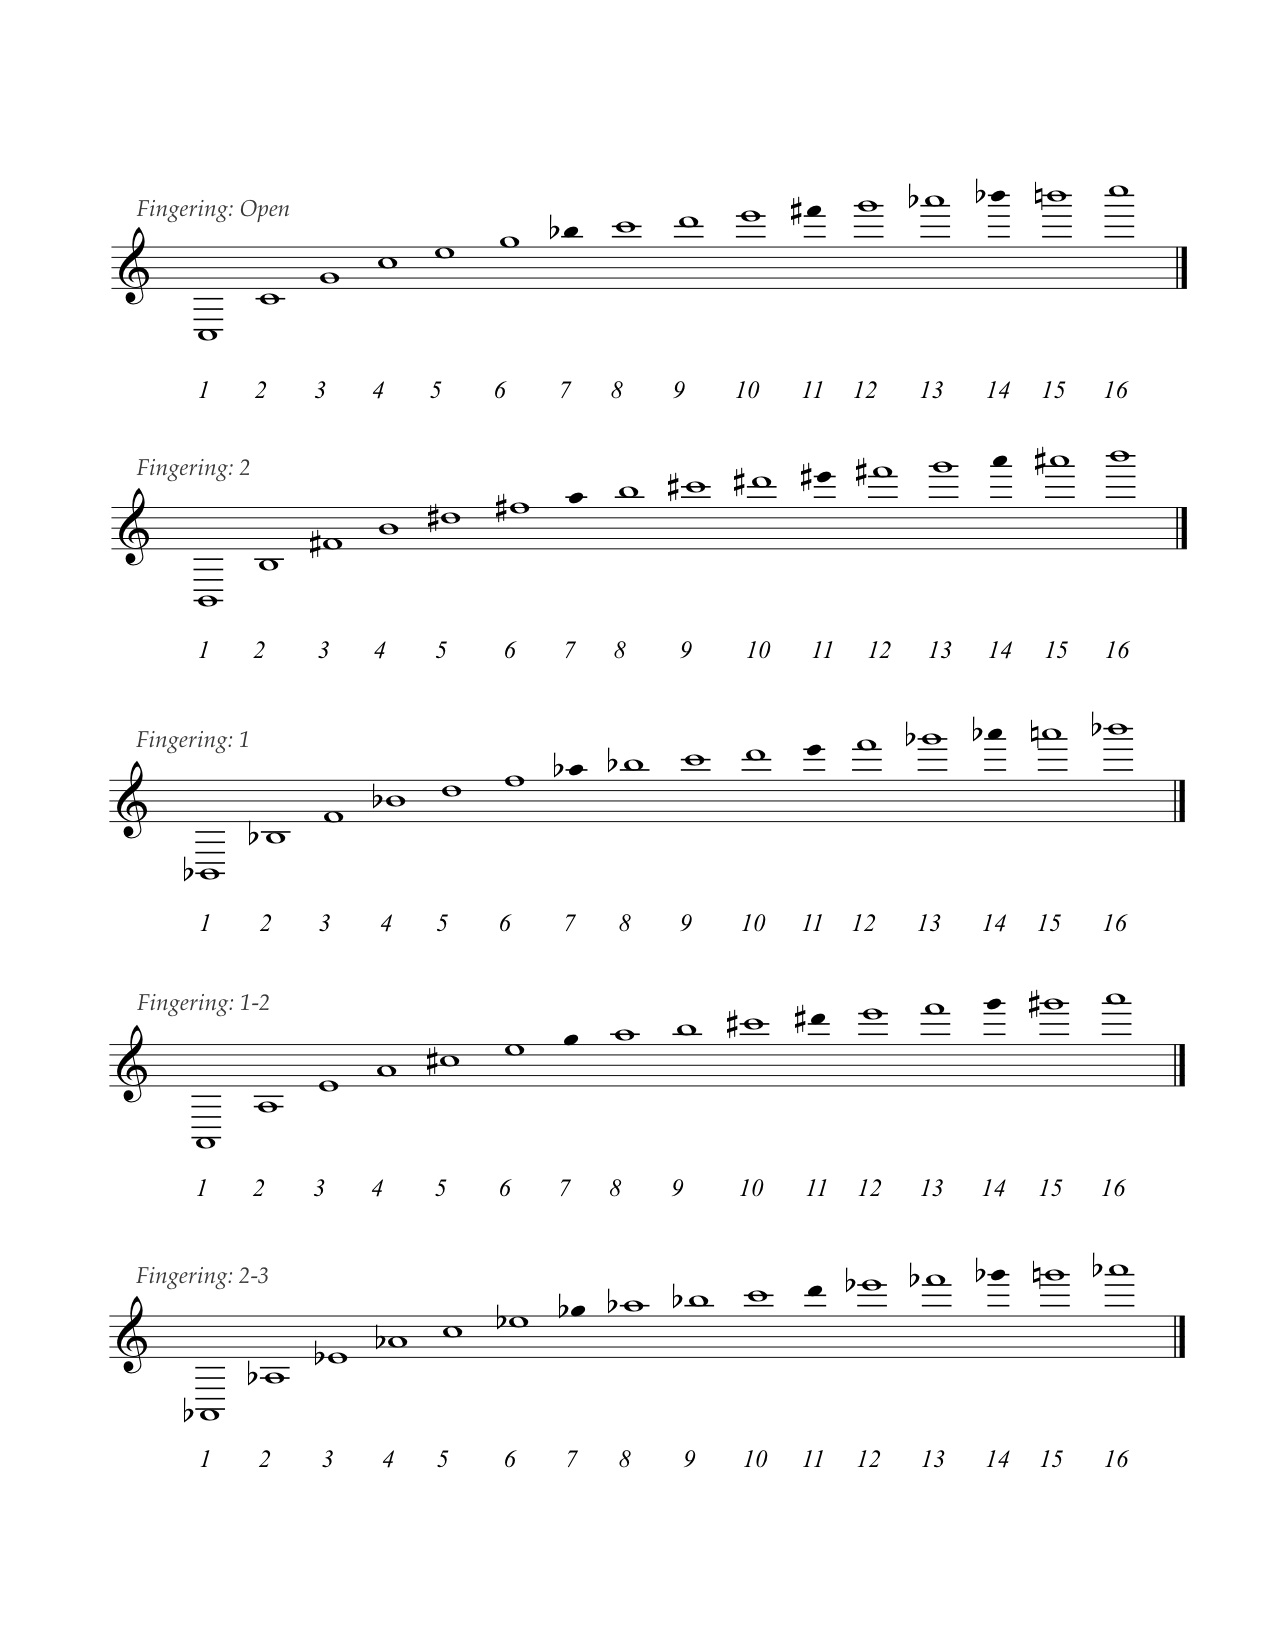
The diagrams shown below indicate all notes that are playable with a given fingering.


I. First Important Principle: The Order of a Note in the Harmonic Series Affects Its Intonation
- The fifth and tenth notes in every series tend to be flat.
- The sixth note in every series tends to be sharp.
- Black (solid) noteheads indicate pitches that are so out of tune (flat) as to be unusable.
All of these tendencies are dictated by the laws of physics, not by the trumpet itself.
Some notes, such as E (fourth space) appear in different places in different series. So if fingered open, the E will be flat, because it is the fifth note (also called the fifth partial) in the open overtone series. If played 1-2, it will tend sharp, since it is the sixth partial in the 1-2 series. Players on B-flat trumpet normally play the E open, but on a C trumpet, which has a slightly different timbre, the sound of a 1-2 E is more appropriate (but it needs a trigger–see below). The seventh partial is almost always unusably flat.
II. Second Important Principle: Intonation Affects Fingering
Trumpet manufacturers often try to compensate for the problems with pitch caused by the harmonic series. As a result, they have modified some of the slides to make certain notes more in tune. In general (except for the seventh partial and a few exceptions on non-B-flat trumpets), the least amount of tubing you can use to play a note, the more in tune it will be!
III. Third Important Principle: Fingering Affects High Notes
When practicing in the upper register, make sure you know what note you are hitting! Many a trumpet player has tried for a high C only to come away with a high B-flat…without having any idea what pitch it was. Also, failure to correct the sharp sixth partial (ex. F on top of the staff) by adjusting the air or triggering increases the likelihood of playing successive notes sharp, which can cause an ascending C scale, for example, to feel unnecessarily difficult.
Triggering (use of first and third valve slides)
According to the Second Important Principle listed above, notes that use a greater number of valves tend to be less in tune. Sometimes, however, no alternate fingering exists and slides must be extended (triggered) to bring them into tune. I require my beginning students to trigger the third valve slide for low D and C# only. I introduce these notes with triggering as a component part of the fingering. Then I wait to see what happens. Some of them will catch on right away. Once a student has mastered D and C#, I also request a first slide trigger for the notes E, A (any octave) and F (on top of the staff). The first slide extensions on the high F and A are absolutely critical for students working above the staff, so that they do not strain on the approach to the high B-flat, B, and C.
Other students will struggle. Sometimes a student’s trumpet is so old and corroded that the slide will not move. Other students have an instrument that does not have a secure third slide ring, and the ring cannot be made to stay in place. Still others have small hands and cannot stretch to extend the slide without obvious discomfort and an interruption in the musical phrase. For students in any of these categories, I abandon the issue until the instrument can be altered or the player’s hands grow larger.
Advanced students, who have been triggering for several years and are comfortable with both first and third slides, can (and should) be shown how to determine the exact slide placement for a particular note. The most obvious method is to use a tuner, but I prefer to use articulation:
- Tune your trumpet to make sure that the main tuning slide is in the right place. Leave the tuner on, but don’t look at it for steps 2–4.
- Pull the slide in as far as possible, and articulate rapidly (single tongue) on the note in question. (It will be very sharp.)
- Repeat this exercise with the slide fully extended (very flat).
- While still tonguing, gradually draw the slide back in. You are looking for the place where the resonance of the trumpet suddenly opens up. The horn will literally seem to vibrate more in your hands.
- Double check yourself by looking over at your tuner. The note should be in tune or very close to it.
The exercise presented above can also be very useful with students who don’t understand why the trigger makes a difference. Students are more likely to use their triggers once they have experienced the feeling of a more resonant instrument.
The following fingering chart shows the fingerings for the trumpet throughout the entire range of the instrument and includes designations for which notes require the student to trigger with the first valve slide (S1) or third valve slide (S2):

For a free dowloadable version of this chart, please visit this link.
Back to Airstream and Control…
